I have created XAML solutions (WPF, Silverlight, Windows Phone, Windows 8) for about 7 years now. This week I learned a new feature which I thought wasn't possible. I learned how you can place DataTemplates with eventhandlers into ResouceDictionaries. I thought this wasn't possible because ResourceDictionaries don't have CodeBehind files to write the eventhandlers in. But I was wrong. You can add a CodeBehind to a ResourceDictionary but you will have to do it manually. This makes it possible to move more DataTemplates and ControlTemplates from Pages and UserControls to ResourceDictionaries which can help to avoid duplicate XAML code.
Demo App
My demo app is a Windows app developed using the MVVM design pattern. It contains a MainPage (view), a MainViewModel (viewmodel) class and a Product (model) class. The MainViewModel has a Products property which is a list of 3 hard coded products. The MainPage has a ListView which ItemsSource is DataBound to the Products property of the MainViewModel. The ItemsTemplate of the ListView is set to the ProductsDataTemplate which is a static resource of the Page. This DataTemplate contains an Image control which has 2 events (PointerEntered and PointerExited). In this example I changed the Opacity of the image when you hover over it using your mouse. It is a silly implementation which could also have been implemented using Behaviors in Blend.
MainPage.xaml
<Page x:Class="ResourceDictionaryWithCodeBehindDemo.MainPage"
      xmlns="http://schemas.microsoft.com/winfx/2006/xaml/presentation"
      xmlns:x="http://schemas.microsoft.com/winfx/2006/xaml"
      xmlns:local="using:ResourceDictionaryWithCodeBehindDemo"
      xmlns:d="http://schemas.microsoft.com/expression/blend/2008"
      xmlns:mc="http://schemas.openxmlformats.org/markup-compatibility/2006"
      xmlns:vm="using:ResourceDictionaryWithCodeBehindDemo.ViewModels"
      mc:Ignorable="d">

    <Page.Resources>
        <DataTemplate x:Key="ProductDataTemplate">
            <StackPanel Orientation="Horizontal">
                <Image Source="{Binding ImageUrl}"
                       PointerEntered="Image_PointerEntered"
                       PointerExited="Image_PointerExited"
                       Opacity="0.3"
                       Width="100"
                       Height="100" />
                <StackPanel Margin="20,0">
                    <TextBlock Text="{Binding Name}"
                               FontSize="30"/>
                    <TextBlock Text="{Binding Price}"
                               FontSize="20" />
                </StackPanel>
            </StackPanel>
        </DataTemplate>
    </Page.Resources>

    <Page.DataContext>
        <vm:MainViewModel />
    </Page.DataContext>

    <Grid Background="{ThemeResource ApplicationPageBackgroundThemeBrush}">
        <ListView Margin="50"
                  ItemsSource="{Binding Products}"
                  ItemTemplate="{StaticResource ProductDataTemplate}">
        </ListView>
    </Grid>
</Page>
The MainPage.xaml.cs file contains the MainPage class with the Image_PointerEntered and Image_PointerExited eventhandlers. They change the Opacity of the Image (sender).
public sealed partial class MainPage : Page {
    public MainPage() {
        this.InitializeComponent();
    }

    private void Image_PointerEntered(object sender, PointerRoutedEventArgs e) {
        var img = sender as Image;
        img.Opacity = 1.0;
    }

    private void Image_PointerExited(object sender, PointerRoutedEventArgs e) {
        var img = sender as Image;
        img.Opacity = 0.3;
    }
}
The MainViewModel.cs file contains the MainViewModel class which has the Products property. The Constructor adds 3 sample products to the List.
using System;
using ResourceDictionaryWithCodeBehindDemo.Models;
using System.Collections.Generic;

namespace ResourceDictionaryWithCodeBehindDemo.ViewModels {
    class MainViewModel {

        public List<Product> Products { get; set; }

        public MainViewModel() {
            this.Products = new List<Product>() {
                new Product { Name = "Computer", Price = 2000},
                new Product { Name = "Car", Price = 34000},
                new Product { Name = "Table", Price = 500},
            };
        }
    }
}
The Product.cs file contains the Product class with the Name, Price and ImageUrl properties.
using System;

namespace ResourceDictionaryWithCodeBehindDemo.Models {
    class Product {

        public string Name { get; set; }
        public double Price { get; set; }

        public string ImageUrl {
            get {
                return "http://lorempixel.com/150/150/technics/" + Name;
            }
        }
    }
}
Add ResourceDictionary
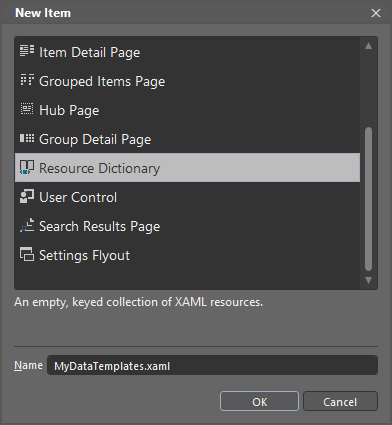
Now you can add a ResourceDictionary to the project. Created a folder Resources in the root of the Project in which you will add the ResourceDictionary file. Create this file in Blend and not in Visual Studio because Blend will add the MergedDictionary code to my App.xaml. I named my file MyDataTemplates.xaml.
MyDataTemplates.xaml will look like this.
<ResourceDictionary
    xmlns="http://schemas.microsoft.com/winfx/2006/xaml/presentation"
    xmlns:x="http://schemas.microsoft.com/winfx/2006/xaml"
    xmlns:local="using:ResourceDictionaryWithCodeBehindDemo">

</ResourceDictionary>
Blend will also add the ResourceDictionary to the MergedDictionary of your Application in the App.xaml.
<Application
    x:Class="ResourceDictionaryWithCodeBehindDemo.App"
    xmlns="http://schemas.microsoft.com/winfx/2006/xaml/presentation"
    xmlns:x="http://schemas.microsoft.com/winfx/2006/xaml"
    xmlns:local="using:ResourceDictionaryWithCodeBehindDemo">

	<Application.Resources>
		<ResourceDictionary>
			<ResourceDictionary.MergedDictionaries>
				<ResourceDictionary Source="Resources/MyDataTemplates.xaml"/>
			</ResourceDictionary.MergedDictionaries>
		</ResourceDictionary>
	</Application.Resources>

</Application>
Add CodeBehind to ResourceDictionary
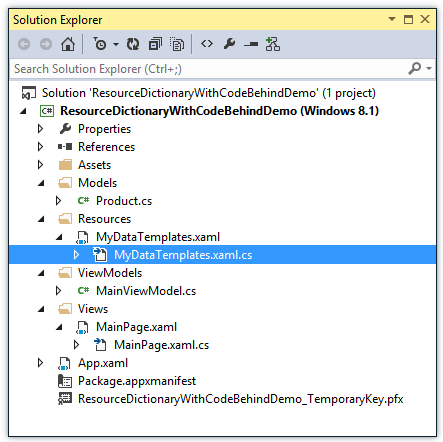
Now you can create the MyDataTemplates.xaml.cs file in the Resources folder of the project. I do this in Visual Studio and not in Blend. In Visual Studio I have installed an the File Nesting extion (created by Mads Kristensen). This extension will automatically nest the codefile in the xaml file. It is not necessary but I like a clean solution. The complete structure of my Solution looks likes this:
Now you must add an x:Class attribute to the ResourceDictionary element in the MyDataTemplates.xaml file. This attribute points to the ResourceDictionaryWithCodeBehindDemo.Resources.MyDataTemplate class. Next you can move the ProductDataTemplate from the MainPage to the ResourceDictionary.
<ResourceDictionary xmlns="http://schemas.microsoft.com/winfx/2006/xaml/presentation"
        xmlns:x="http://schemas.microsoft.com/winfx/2006/xaml"
        x:Class="ResourceDictionaryWithCodeBehindDemo.Resources.MyDataTemplates"
        xmlns:local="using:ResourceDictionaryWithCodeBehindDemo">

    <DataTemplate x:Key="ProductDataTemplate">
        <StackPanel Orientation="Horizontal">
            <Image Source="{Binding ImageUrl}"
                   PointerEntered="Image_PointerEntered"
                   PointerExited="Image_PointerExited"
                   Opacity="0.3"
                   Width="100"
                   Height="100" />
            <StackPanel Margin="20,0">
                <TextBlock Text="{Binding Name}"
                           FontSize="30" />
                <TextBlock Text="{Binding Price}"
                           FontSize="20" />
            </StackPanel>
        </StackPanel>
    </DataTemplate>

</ResourceDictionary>
The MyDataTemplate class must be a partial class. You must also add a constructor (use the ctor snippet) to the class and call InitializeComponent(). This InitializeComponent method will be automatically generated if you set the x:Class attribute in the XAML. Finally you can move the eventhandlers from the MainPage to the MyDataTemplates class.
using System;
using Windows.UI.Xaml.Controls;
using Windows.UI.Xaml.Input;

namespace ResourceDictionaryWithCodeBehindDemo.Resources {
    partial class MyDataTemplates {

        public MyDataTemplates() {
            this.InitializeComponent();
        }

        private void Image_PointerEntered(object sender, PointerRoutedEventArgs e) {
            var img = sender as Image;
            img.Opacity = 1.0;
        }

        private void Image_PointerExited(object sender, PointerRoutedEventArgs e) {
            var img = sender as Image;
            img.Opacity = 0.3;
        }
    }
}
The App.xaml must also be changed. You will have to register an extra xml namespace named res which holds the 'using:ResourceDictionaryWithCodeBehindDemo.Resources' value. In the MergedDictionaries element you must remove the MyDataTemplates ResourceDictionary and add an <res:MyDataTemplates /> element. This will instantiate an instance of the CodeBehind class. The constructor of the class will load the XAML in the InitializeComponent() method.
<Application
    x:Class="ResourceDictionaryWithCodeBehindDemo.App"
    xmlns="http://schemas.microsoft.com/winfx/2006/xaml/presentation"
    xmlns:x="http://schemas.microsoft.com/winfx/2006/xaml"

    xmlns:res="using:ResourceDictionaryWithCodeBehindDemo.Resources"

    xmlns:local="using:ResourceDictionaryWithCodeBehindDemo">

	<Application.Resources>
		<ResourceDictionary>
			<ResourceDictionary.MergedDictionaries>
				<!--<ResourceDictionary Source="Resources/MyDataTemplates.xaml"/>-->
                <res:MyDataTemplates />
			</ResourceDictionary.MergedDictionaries>
		</ResourceDictionary>
	</Application.Resources>

</Application>
The MainPage.xaml now doesn't have the ProductsDataTemplate.
<Page x:Class="ResourceDictionaryWithCodeBehindDemo.MainPage"
      xmlns="http://schemas.microsoft.com/winfx/2006/xaml/presentation"
      xmlns:x="http://schemas.microsoft.com/winfx/2006/xaml"
      xmlns:local="using:ResourceDictionaryWithCodeBehindDemo"
      xmlns:d="http://schemas.microsoft.com/expression/blend/2008"
      xmlns:mc="http://schemas.openxmlformats.org/markup-compatibility/2006"
      xmlns:vm="using:ResourceDictionaryWithCodeBehindDemo.ViewModels"
      mc:Ignorable="d">

    <Page.DataContext>
        <vm:MainViewModel />
    </Page.DataContext>

    <Grid Background="{ThemeResource ApplicationPageBackgroundThemeBrush}">
        <ListView Margin="50"
                  ItemsSource="{Binding Products}"
                  ItemTemplate="{StaticResource ProductDataTemplate}">
        </ListView>
    </Grid>
</Page>
MainPage.xaml.cs now only contains the constructor.
public sealed partial class MainPage : Page {

    public MainPage() {
        this.InitializeComponent();
    }
}
Closure and download
I hope you like my solution it will open up a lot of extra possibilities to structure your XAML projects. You can download the sample project below.
Cheers,
Fons
DownloadAll postings/content on this blog are provided "AS IS" with no warranties, and confer no rights. All entries in this blog are my opinion and don't necessarily reflect the opinion of my employer or sponsors. The content on this site is licensed under a Creative Commons Attribution By license.

Blog comments
AKH
30-Oct-2019 2:12